I’ve told you some of the story of Joanne Chang, the Harvard educated economist who threw in the towel and went on to open “Flour”, a Boston bakery and cafe that’s grown to three locations. That was between opening a marvelous pan-Asian restaurant called “Myers + Chang” with her husband, Christopher Myers. But in case you missed it, Ms. Chang’s culinary education bears repeating; it is such an American story. Ms. Chang grew up in a first generation Chinese American family in Texas. Her introduction to American desserts consisted of visits to friends’ houses and the consumption of such great American classics as Wing Dings, Whoopie Pies, and Oreo Cookies. Now, as one of the most inventive of bakers, Ms. Chang has re-invented some of her childhood favorites in recipes she shares in her cookbook “Flour” (Chronicle Books 2010). Here on Chewing the Fat, we’ve already shared her recipe for homemade Oreos (http://chewingthefat.us.com/2011/05/homemade-oreo-cookies-courtesy-of.html). That was such a success that it was just a matter of time before Andrew tackled another one: Her delicious caramel and chocolate confection called the Milky Way tart. And when he did, I think he actually improved it.
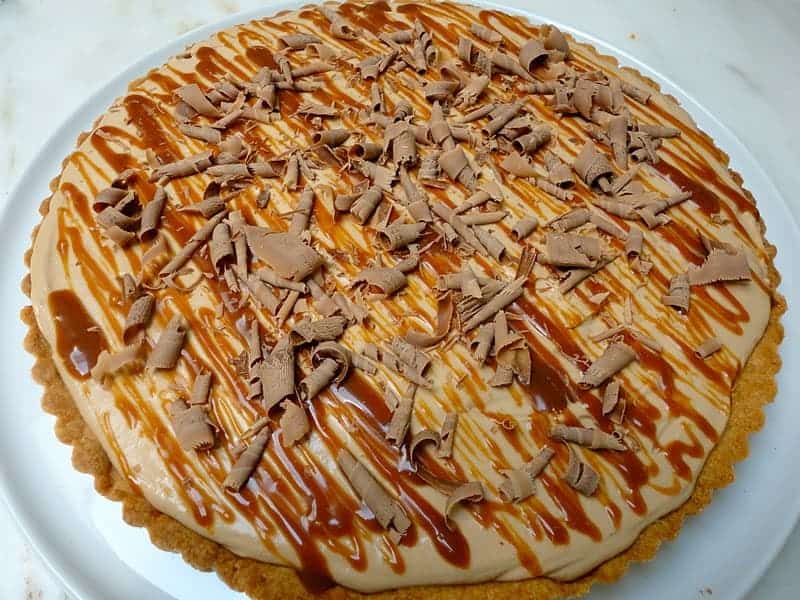
The Milky Way Candy Bar is all of 88 years old, having been invented by Frank C. Mars of Minneapolis MN in 1923. It’s made of chocolate–malt nougat topped with caramel and covered with milk chocolate. It was the first commercially distributed filled chocolate bar. It was not named for the Milky Way Galaxy but rather for a famed malted milkshake of the same name. And it got its chocolate from another famous name: Hershey’s supplied its chocolate to the Mars company for coating the Milky Way. Interestingly, Ms. Chang’s recipe does not contain the malted milk flavor. Instead it is a lighter-than-air chocolate mousse-filed tart in a buttery flaky crust. Under the mousse lies a layer of rich caramel. More caramel is drizzled over the mousse and the whole thing is topped with shavings of pure milk chocolate. It is so very, very good. Now this is no fly-by-night tart. In fact, it requires about 10 hours to complete. Of course the prep time is all of about 60 minutes including the pastry shell. So this recipe looks positively daunting. Fortunately, it’s the baking and resting and chilling that take up the bulk of the 9 hours. And what was Andrew’s improvement?
1. Using a stand mixer fitted with the paddle attachment, cream together the butter, sugar, and salt on medium speed for 2 to 3 minutes, or until pale and light. Scrape the sides and bottom of the bowl with a rubber spatula. Add the flour and beat on low speed for about 30 seconds, or until the flour mixes with the butter-sugar mixture. The mixture will look like wet sand. Add the egg yolk and continue to mix on low speed for about 30 seconds, or until the dough comes together.
2. Wrap the dough tightly in plastic wrap and refrigerate for about 1 hour. (At this point, the dough can be stored in the refrigerator for up to 5 days or in the freezer for up to 2 weeks. If frozen, thaw it in the refrigerator overnight before using.)
3. Line a baking sheet with parchment paper and place a 10-inch tart ring on top. Remove the dough from the refrigerator and let soften at room temperature for about 30 minutes. Using a rolling pin, bang and flatten the dough into a disk about 1/2 inch thick. Flour the work surface, and then sprinkle the dough disk with a little flour. Roll out about 12 inches in diameter and just under 1/4 inch thick. Make sure the work surface is well floured so the dough doesn’t stick to it, and make sure the disk itself is floured well enough to keep the rolling pin from sticking to it. Roll from the center of the disk outward, and gently rotate the disk a quarter turn after each roll to ensure the disk is evenly stretched into a nice circle. Don’t worry if the dough breaks a bit, especially toward the edges. You can easily patch any tears once you have lined the pan.
1. Place the chocolate in a small heatproof bowl. In a medium saucepan, combine the cream and instant coffee powder and heat over medium-high heat until the mixture is scalded, which means when bubbles start to form around the edge of the pan but the cream is not boiling.
2. Immediately pour the hot cream mixture over the chocolate and let stand for about 1 minute. Then whisk gently until the chocolate is completely melted and the mixture is smooth. Strain through a fine-mesh sieve into a small container, stir in the salt, cover tightly, and refrigerate until it is absolutely, completely chilled, at least 8 hours and up to 3 days. A few hours is not enough. (Because the cream has been heated, it will not whip properly unless it is very cold.)
3. Place the sugar in the bottom of a medium saucepan and slowly pour in the water. Stir gently to moisten the sugar. If any sugar crystals are clinging to the sides of the pan, brush them down with a pastry brush dipped in water. Place the pan over medium-high heat and leave it undisturbed until the mixture comes to a rolling boil. (You want to avoid crystallization of the syrup, which can happen if the pan is disturbed before the sugar starts to color.) Then continue to boil rapidly without moving the pan until the sugar syrup starts to caramelize. This will take 3 to 4 minutes: the sugar syrup will boil furiously; then as it thickens, it will boil more languidly; and then you will see some of the syrup starting to color and darken around the edge of the pan.
4. When you see color in the pan, gently swirl it in a circular motion so the sugar caramelizes evenly. The syrup will start to turn golden brown, and then as you swirl the pan, the syrup will continue to get a bit darker and then darker still. To check the true color of the caramel, tilt the pan so you can see the syrup covering the bottom. This is the actual color of the caramel, and you want to keep cooking the caramel until this layer is a deep amber-brown. It takes just seconds for caramel to go from great to burnt, so be sure to tilt and check constantly.
5. As soon as the caramel is ready, slowly add the cream and then reduce the heat to low. Be careful. The steam that rises when the cream hits the caramel is extremely hot. Let the caramel and cream sputter for a few seconds until the mixture settles down, and then whisk to mix in the cream. Turn the heat up to medium and whisk together the caramel and cream (the mixture will have hardened a bit) for 2 to 3 minutes, or until they come together. Whisk in the butter, salt, and vanilla. Remove from the heat, pour into an airtight heatproof container, and refrigerate for at least 4 hours and up to 1 week.
Using a stand mixer fitted with the whip attachment or a hand-held mixer or a whisk, whip the mousse on medium speed until it holds soft peaks. Mound the mousse in the tart shell, and spread it evenly over the caramel filling.
Drizzle the remaining one-fourth caramel filling in a crisscross pattern on top of the mousse. Using the back of a small knife or a vegetable peeler, shave curls from the milk chocolate slab. (Make sure the chocolate is slightly warm, or you will get splinters instead of curls.) Decorate the tart with the curls. Put the tart in the freezer for at least 60 minutes before serving.
The tart can be frozen for up to 8 hrs





looks delicious!